We’ve been looking for cookies for a quick dessert or snack, and not finding exactly what we wanted at the places we usually shop – Walmart, the grocery store we sometimes frequent, or Pricesmart. It dawned on us that we could make cookies ourselves! After all, we’re retired and have made cookies before, so why not try?
John and I don’t exactly have the same taste in cookies. He’s fond of chocolate chip, while I am more of an oatmeal cookie kind of girl. We decided that we would just bake two different kinds of cookies. I found an oatmeal craisin cookie recipe on the back of the craisin package. John found his favorite Toll House chocolate chip recipe online, so we were ready.
We’d already purchased cookie sheets, mixing bowls and a hand mixer, so we had most of the appropriate utensils. The recipes did suggest using a wire rack for cooling. We didn’t have one but thought we could get by without it. Buying ingredients didn’t provide too much of a challenge either, mostly basic ingredients were required. Well, except that my recipe called for white chocolate chips, which couldn’t be found at all at Walmart. It was chocolate chips or nothing, so I chose to forgo those chips and just increase the amount of craisins.
I did wonder about the elevation and if that would be a factor in baking. The elevation of Escazú is 3,900 feet above sea level. According to my quick internet research, high elevation starts at 3,500 feet, and there are some adjustments you should make. My initial research just mentioned increasing liquids. We didn’t really have that many liquids in our recipes, so didn’t make any adjustments. However, the “after-the-fact” research that I did was more comprehensive, and included tips that directly affected our cookies, like increasing flour, decreasing sugar, increasing the temperature, and decreasing baking time. In hindsight, that probably explains a lot, but not everything.
We decided to make one type of cookie one day and the other the next. We have a small oven and small amount of counter space, so that made sense. Whose cookies to make first? John offered to have me make mine first. I could see right through that “generous” offer. “You just want my cookies to be the ‘guinea pigs’ don’t you,” I said. “Yep,” he replied.
It was more than the altitude that was concern for a cookie test run. It was really more about the oven. There was an oven in the apartment when we first looked at the apartment. We didn’t pay too much attention to it; it was there, that was all that mattered. In our first trip in July to our apartment, our landlord admitted that the oven wasn’t hooked up yet, but she would have it ready when we officially moved in at the end of July. We didn’t need to use an oven during our first trip, as it was a short trip, we still needed to stock up on things, and had planned on mostly eating out. The oven would be ready when we permanently moved in at the end of July, and that was all that mattered.
The oven had electricity when we moved in at the end of July. We could tell, because the small LCD display had numbers on it. We thought that it was supposed to be displaying the time. It looked like military time, and even then, it wasn’t set correctly, but we had so many other things to do when we first got settled, we didn’t think too much about it. Until we didn’t have so many other things to do, and it was kind of annoying to see a display that didn’t mean anything to us. So, we decided to change it. But we quickly realized that we didn’t know how and there was no where to get help.
Our landlord had left a stack of instruction manuals for our appliances. We looked there first and found nothing for the oven. Most instruction manuals are on-line these days, so the internet was where we checked next. We both separately searched for our oven make, CATA, and model. We’d never heard of CATA ovens before (apparently they are from Spain). No instruction manual on-line. The closest we could find was a promotional brochure, but it contained no explanations of any kind.

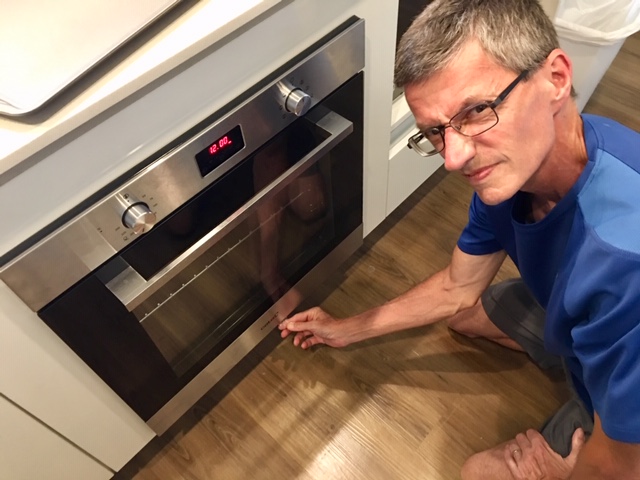
We were left with figuring it out on our own. The oven is very close to the ground – the top display is less than 30 inches above the floor. (John’s note: the “F” button in the above photo does NOT stand for Fahrenheit. It may stand for “Function” but more likely a verb ending in “you!”). We found out quickly that anytime we have to work with oven functions, we are better off sitting on the floor to do it. We also quickly found out that although the oven was plugged in, it was not really installed. We were somehow always pulling out the oven from under the island top whenever we tried to work the oven functions, and we were constantly trying to work the oven functions. It was disconcerting to have a pull-out oven.
We sat on the floor and tried to adjust the time. Every time we pressed the F button an underline (like a cursor) moved across the symbols, from the bell symbol to the first clock symbol, to the second clock symbol to the third clock symbol. We guessed that the first bell was a timer and the last clock was the time. Our concern was the two clocks in the middle. Maybe programmable oven start and end times? When we moved the cursor each of these had times displaying. What if we were inadvertently setting an oven start time? The oven was already moving around more than it should –was it capable of starting on its own as well, in the middle of the night when we were sleeping?
When I got the cursor under the final clock symbol, I tried in vain to press the minus or plus button to set the time. John was finally able to press hard enough to get the clock set. At that point we decided to ignore the middle buttons and hope that since we had so much trouble setting the clock that the oven wouldn’t be able to turn itself on or off with ease. (As an aside, we had a short electrical outage one afternoon after we set the oven clock. We decided it was too much trouble to reset it again and are no longer bothered by it displaying the incorrect time.)
We still needed to work the oven itself to bake cookies. I opened the oven door and found one oven rack and something that looked like a roaster pan attached to the bottom rack groove of the oven. I removed that. Hmm, only one rack. Only one cookie sheet fits on the oven rack in this small CATA oven. It was going to be a long afternoon making cookies one sheet at a time.
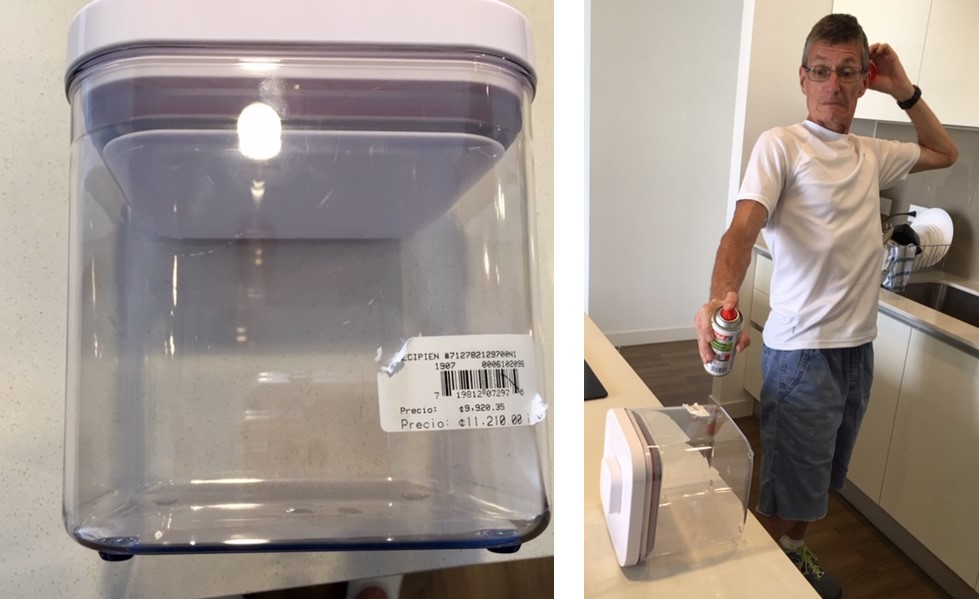
I also noticed that there was a piece of sticky tape at the bottom of the door, on the inside. Good thing I noticed that before we turned the oven on, otherwise there would have been burned plastic in our oven, and more than likely it would set off the smoke alarm. Actually, I was more than just noticing – I was looking for something like that. Why? Because everything you buy in this country has a sticker on it! I mean everything! And it is really hard to get the stickers removed!
For example, all the plastic tubs we bought for refrigerating items/leftovers had stickers on them. All the dishes we bought had stickers on them. All the utensils we bought had stickers on them. Everything you buy has these stickers! You can’t just peel off the stickers from whatever it is you just purchased. You can get part of it but not all of it. Even what is left after you try to peel off the stickers doesn’t come off with soap and water. (Maybe if the water were really hot, but we don’t have really hot water…)
We finally resorted to buying adhesive remover. We looked for that at Walmart but didn’t find it in any of the obvious places – no surprise there. We did manage to find a professional grade adhesive remover in one of the stores in our apartment complex. It was in the school supply section. This store has five or six aisles of school type supplies. If we ever need colored markers, glue, glitter, construction paper and poster board for a Spanish school poster, we are set!
John is well-practiced in the art of adhesive removal now, but admittedly, we can’t use the adhesive removal in all situations.
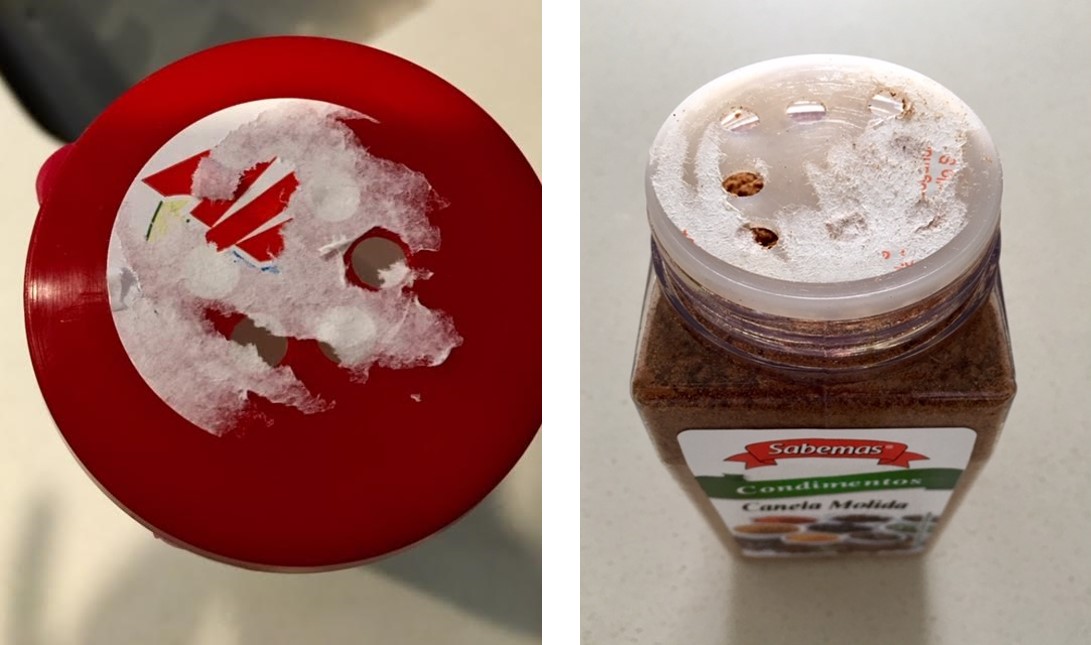
John did his usual job of removing the sticky tape, and we were on to the next challenge, deciphering the oven control knobs.
The knob on the left side of the oven is for the temperature. There is no digital display of the temperature. It is just a knob, with intermittent temperatures marked. And for fun, the settings are in Celsius.
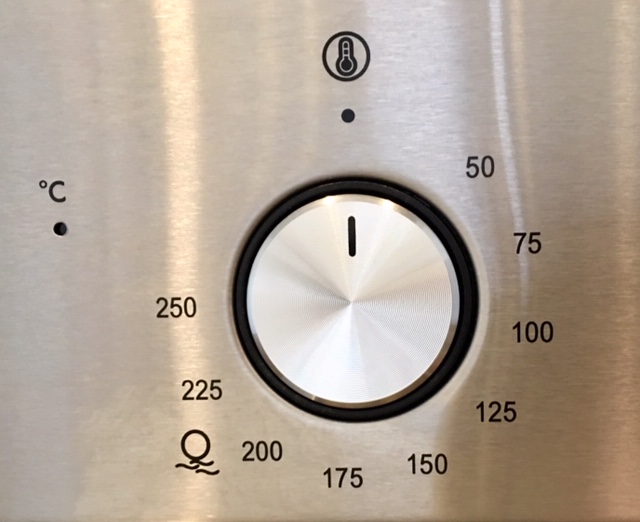
Our cookie recipes called for the oven to be set at 375 degrees Fahrenheit. John used a Fahrenheit to Celsius converter on his cell phone and did the conversion. 375 degrees Fahrenheit is 190.556 degrees Celsius. Oh, that’s easy, NOT. You push the knob, it pops out, and then you can move the dial. (And no, the top digital display does NOT display the temperature.) Where in the world do you set 190.556 degrees Celsius? Even if you wanted to do an even 200 degrees, it’s not obvious – point it at the 2 of 200, the first 0, the second 0 – where exactly? And, at what point between the 175 and 200 markings is 190.556? I settled for what I thought was slightly below 200, to the right of the last 0 in 200. I had the temperature, or something close, but now actually had to start the oven.

We could kind of figure out the symbols from general oven control symbol information found on-line, which is better than guessing. For example, we guessed that the symbol to the right of the light was for oven self- cleaning, since it had a water drop. Wrong! It is for defrosting – it just circulates air with no heat. Would have waited a long time for the oven to clean itself that way. (I have no idea what the symbol is that looks like a person’s head above water. This symbol is found on both knobs, so must be important. Still, I can’t find it anywhere on the internet.)
We settled on the first symbol to the left for baking our cookies, which is the bottom heating element. Isn’t that how our ovens at in the US worked? Probably not, it turns out. Again, after-the-fact research indicates that this setting is best for things that you need to have crisp on the bottom like pizzas. I don’t like my cookies crisp on the bottom. Guess how they turned out? Oh well, at least they were edible.

The next day John suggested that we should by the wire rack for cooling. I had used the roasting pan as a makeshift cooling space for my cookies. Not sure if he thought that an actual cooling rack would help HIS cookies, but in the interest of anything helping my future cookie success, I agreed. We once again ventured to Walmart to find a wire cooling rack. We found the small area with baking supplies, like baking sheets, bundt cake pans, etc., but no wire racks. We then thought, maybe wax paper? We looked in the section with plastic wrap and found aluminum foil but no wax paper. Aluminum foil might come in handy, so we bought that.
We have two stores in our apartment complex where we have found cooking items. We searched the one that usually had better prices first. No wire racks, but we did pick up a couple of inexpensive placemats to use when we ate at our kitchen island. Off to the next, more expensive, and final store. “What if we find plastic wire racks?” John joked. And, then, there they were – two plastic racks! The plastic was very sturdy and seemed perfect for cooling cookies. We quickly bought them and went back to our apartment. Of course, the first thing we had to do was remove the stickers. I was curious what the label said, and from Google translate, we ascertained that these were really dish drying racks. Still, they could easily be used as cookie cooling racks, so we pressed on.
John’s cookies didn’t gain much from my trial run the previous day and the new cookie cooling (dish drying) racks. We still hadn’t made the appropriate cooking adjustments for elevation, we were still guessing where the temperature knob should go, and we selected the bottom heating element only. Again, oh well, at least they were edible!

There are certain to be more adventures with this oven, which I have now started calling “CACA”(rather than “CATA.”) Fun fact, “caca” means “cookies” in Swedish. But it means what you think it does in Spanish, so the name works in multiple languages.
